Tắt window defender win 10
Hướng dẫn tắt window defender win 10
Windows Defender là 1 phần mềm diệt virus được tích hợp sẵn trong window defender win 10 để bảo vệ máy tính. Đây chính là phần mềm Microsoft security essential dành cho các máy tính win 7 XP. Đa số người dùng đều tin tưởng rằng đây là phần mềm bảo vệ tốt cho máy tính.
Trong bài viết này mình sẽ giới thiệu tới các bạn 2 cách tắt mở phần mềm windows defender này trên win 8 hoặc 8.1 hoặc win 10(Mình tham khảo ở một trang web it nước ngoài lên không muốn dịch ra tiếng việt cách bạn tự châm cứu hoặc google dịch nhe.)
Cách 1:
Method 1 - Tweaking the Registry
In this method you’ll learn how to disable Windows Defender by making changes in the registry.Step 1: Open the Registry Editor
Press Win + R (“Win” is the Windows key in your keyboard) to open the Run dialog box, type “regedit” in it (without quotes) and press Enter. The Registry Editor will appear.Step 2: Navigate to Windows Defender’s Directory in the Registry
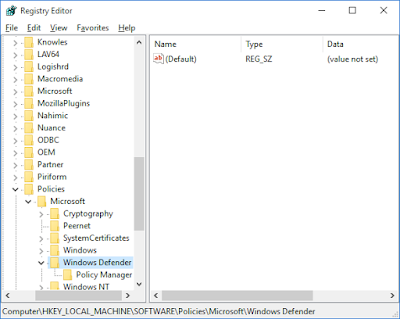
On the left pane in the Registry Editor, navigate to the following directory:HKEY_LOCAL_MACHINE\SOFTWARE\Policies\Microsoft\Windows Defender
Step 3: Create a New DWORD Value
Right-click anywhere on the empty space in the Registry Editor's right pane and choose New > DWORD (32-bit) Value. This DWORD will be named as New Value #1 and will have a default value of 0. Rename the DWORD to DisableAntiSpyware and change its value to 1 (right-click on it > Modify... and type 1 in the Value data box, then click OK).To turn Windows Defender back on, simply change the value of the DWORD to 0 (0: Enabled, 1: Disabled).
Below are two registry files that automatically turn on and off Windows Defender. Simply download and double-click on the one you wish to use:
Disable Windows Defender.reg
Enable Windows Defender.reg
- Cách 2:
Method 2 - Using Group Policy
In this method we disable Windows Defender using Group Policy.Step 1: Open the Local Group Policy Editor
Press Win + R (“Win” is the Windows key in your keyboard) to open the Run dialog box, type “gpedit.msc” (without quotes) and press enter. This will bring up the Local Group Policy Editor. If you are prompted by UAC, click Yes.Note: Local Group Policy Editor is not available in Windows 10 Home edition
and is only available in Windows 10 Pro and Windows 10 Enterprise editions.
Therefore if you have Windows 10 Home, you cannot use this method.
Step 2: Navigate to Windows Defender’s Location
In the left pane of the Local Group Policy Editor go to the following location:Computer Configuration > Administrative Templates
> Windows Components > Windows Defender
Step 3: Enable “Turn Off Windows Defender” Policy
Once you have gone to the above location, you can see several different items in the right pane of the window. Those items represent policies. So, what we need to do now is locate the “Turn off Windows Defender” policy and double click on it.In the window that will open, check the “Enabled” option on the left side and click OK.
Windows Defender is now turned off. If you wish to turn it back on, simply change the same policy’s status from “Enabled” to “Not Configured” or “Disabled” (both do the same job in this case).


Post a Comment